
First up, I am regularly asked what camera and lenses I use. So here is my list of gear:
Ok so a strap is not necessarily gear, but I love that pretty little camera strap. And I get tons of compliments on it while I'm out and about so I figured it was worth sharing. Moving on :o).
I received my Canon as a graduation gift from my parents in 2008. How did I settle on a Canon? Honestly, I don't remember. I believe I asked my friend Annie what camera she would recommend for an entry level DSLR, and she responded with something like 'Nikons are great (I think she uses a Nikon?) but most parents I know have a Canon.' Obviously I didn't have a child at the time, but I knew at some point in my life the reason I wanted a decent camera was to take pictures of kids. Canons seem to be pretty user friendly and one of my favorite photographers, the lovely Adrienne Maples, uses a Canon. Good enough reasons, right? As I've mentioned before, I would love to upgrade my camera to something with better ISO capabilities. I'm often in low light situations and I don't like the look of 'noisy' pictures. But so far the Canon has served me well.
I pink puffy heart my nifty fifty lens, simply for the fact that I can lower the aperture way down when the light isn't great. Not to mention is was only $100. If you were only going to get one lens in addition to your kit lens I would say that is the way to go (granted I haven't had many other lenses so what do I know? :o). Using a prime lens definitely had a bit of a learning curve at first, you have to zoom with your feet! I think the only problem I've had with my 50mm, is that sometimes I can't get far enough away from Ryann to capture the scene.
I do also love my 18mm-200mm lens as well, but as I've said, I'm not quite as good in manual with that lens, so I tend to favor my 50mm. The only reason I got the 18mm-200mm lens, was because the auto focus on my kit lens stopped working. Some people will say that the kit lenses are nothing but junk, but I still think you can get a great photograph with a kit lens. The gear doesn't make the photo, the photographer does. For some great thoughts on that, scroll down to the 'what gear do you use' question in this post.
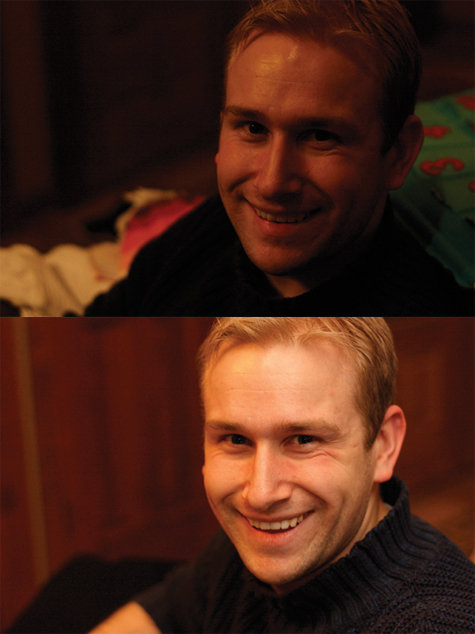
The light scoop is a fun little gadget I received for Christmas this year. I'm beating a dead horse here, but the lighting in my house STINKS. I've got a couple stops that get decent light during the day, but overall it is pretty dim and shadowed. And at night, well, I'm pretty much screwed. Not to mention a lot of times I want to take pictures at indoor or evening events and that is when natural lighting is tough to find. Usually I just say screw it, and either shoot with my blinding ugly flash on, or I don't take pictures. Enter the light scoop. It bounces your on camera flash off the ceiling, so you don't end up washing everyone out. The pictures still don't look 100% natural, but in my opinion it is a lot better. Here are some examples that I shot really quickly right after I got it. The images have the same settings, just a variation on the flash.

The white balance lens cap I also received as a Christmas gift, but I haven't played around with it as much. I was hoping it would help me out in lower light situations as well, but it was quite as quick and easy as I was hoping. I'm not quick with it yet so of course I tossed it aside for the time being. But I can see how it could be pretty useful.
Now on to my extensive photography knowledge and tips :o). Because of my graphic design major, I was required to take two photography classes in college (which honestly I would have signed up for anyway, I love taking pictures). There I learned some of the basics of composition, lighting and the technical aspects and terms of photography. But to tell you the truth it didn't really sink in until I wanted to improve the photos I was taking of Ryann. So here is my best attempt at some bulleted tips.
Just keep shooting.
We've discussed that I have an over abundance of photos on my hard drive, correct? Well, that is because I almost always have my camera set to continuous shooting. Meaning the shutter keeps clicking for as long as I hold the button down. Kids are rarely sitting still, nor do they often cooperate with exactly what you want them to do. When I think I'm about to get a decent shot of Ryann, I usually start clicking a second or two before I think I need to, and keep holding for a second after I think I've gotten 'the shot'. I may have 5 to 7 frames of virtually the same thing, but only one of them will be a keeper.
Seek out good lighting.
There is a reason that most of my pictures of Ryann are in one of three places (her high chair, the front wall in our house and in our front yard in the evening). Those locations have the best light, thus creating the least amount of work for me. The best light is generally diffused natural light. You usually want a lot of light, but don't want the sun shining directly on your subject.
Shoot in manual!
Yes, I know that can sound daunting, and maybe you don't want to jump straight to manual, but please please PLEASE stop shooting in automatic mode. Many of you have asked how my photos have improved so quickly over the last several months. One of the major factors is that I switched to full manual mode. Auto is fine and dandy to capture an image, but you don't really get the ability to control the photograph. I used to mainly shoot in aperture mode, but still my camera wouldn't do exactly what I wanted. Duh. Why didn't I just tell it exactly what I wanted? Yes there is a bit of a learning curve, but again, it's digital. Take lots of shots and practice practice practice!
Crop on camera, not on the computer.
Some people will take a series of photos and then go back later and crop to get the composition they want or like the best. That is all fine and dandy, but I believe you will get more interesting shots if you try composing your image while you are shooting it. Take a picture of the entire scene. Move in, get a detail shot. Use your camera to tell the story you want to remember. A little crop here or there to edit out that pair of underwear strewn on the floor on the edge of your scene, well that is probably a good thing :o). But if you start doing some major cropping on the computer you'll lose some of the quality of the photograph.
Change your angle.
All of my 60+ year old neighbors must think I'm nuts. I'm frequently sprawled out on my stomach in the middle of my driveway. One of the easiest ways to play with the look of your photographs is to change the angle in which they are taken. For most pictures of Ryann I try to get down on her level. See the world as she is seeing it. Otherwise I'm always getting pictures partially of the top of her head. Some shots like that can be great, because that is truly how I see her a lot. But it doesn't tell the whole story. So get on your knees. Lay on the ground. Stand on a chair (safely of course :o). Change your angles! Just yesterday Ashley Ann shared a series of photos she took with her iphone from a variety of different angles. It is amazing to see how the scene changes just by moving your body.
Learn the technical junk.
Unfortunately there is no magic button or special camera that can automatically turn out show stopping photographs. You don't have to be a photography genius to take a pretty picture, but it would be incredibly helpful to know a few of the basics. Learn what ISO, aperture, and shutter speed are and what they do to your images. I could try and sit down and explain it all to you, but again, I'm no genius and I'd probably mess it all up. Thankfully people like Shawna and Ashley (who are professionals :o) regularly share great photography information all the time. Search photography tips on pinterest, you'll get plenty of results. If you want somewhere to start, I've read the book Mamarzzi and think that it is excellent for someone trying to get a good handle on their DSLR, especially for those focusing on kiddos :o).
Now the other thing that has changed the look of my photos over the last several months, are free photoshop actions. Namely those provided by the Pioneer Woman. I know my way around the basics of photoshop, but photo editing can take a lot of time. Actions have increased my efficiency, and made photo editing just a little more fun. One thing I will say about actions, is that I rarely use them at 100%. My favorites are 'boost', 'bring out the eyes' and 'sharpen this'. But I generally use them at about 25% opacity.
I thought I'd share a before and after, so you could see what some of my editing looks like. The change is drastic, BUT I am still trying to maintain a natural look. Personally I don't like doing too many crazy things to my photos, simply because I think it dates them or can be trendy. Don't get me wrong, sometimes those looks are fun, and there is a place and a time for them. But for me, I want to preserve my memories as naturally as possible. An important tip though? ALWAYS SAVE THE ORIGINAL. My editing skills have improved quite a bit over the last two years, so it is nice to have some of the originals to go back and re-edit to get a better image. But back to the before and after:
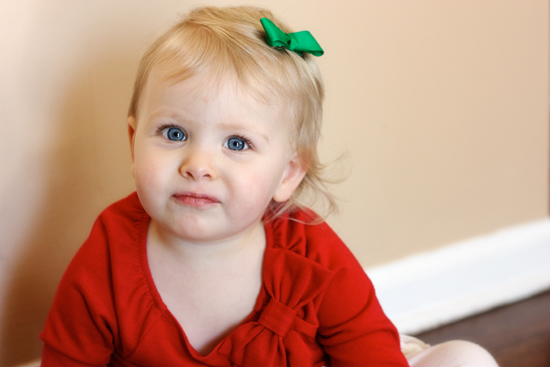
For this photo I used the 'slight sharpen', 'slight lighten', 'sharpen this' (25%), 'bring out the eyes' (25%) and 'lovely and ethereal' (50%) actions. I also slightly corrected the levels and most likely used the healing tool to get rid of some food particles, boogers or rough skin :o). Some people will say it is wrong to fix the blemishes, but again, I am never trying to make the photos look unrealistic. If there is a big ketchup smear on Ryann's chin, that has nothing really to do with why I'm taking the picture, I'm going to edit it out if I can. In the summer I was regularly editing out nasty bug bites. I'm pretty sure it is going to make no difference to Ryann later on in life that I didn't leave the giant red bump on her forehead. I leave everything that is important, or that makes her, well her, but some stuff just isn't necessary.
Wow. Did you make it this far through all of my rambling? I hope this was at least somewhat helpful to a few of you out there. My biggest piece of advice? Just keep trying. Take a million pictures. Practice doesn't ALWAYS make perfect, but it sure helps you learn!
11 comments:
Love all your tips! And your editing looks great! And ps: I've been toying with the idea of a light scoop for a while, I think I need to just buck up & do it!
GREAT tips and info! I just received a Canon Rebel for Christmas, so the process of trial and error begins:-) Luckily, I have a professional photographer for a brother-in-law, so I'll get a few workshops in! xoxo
I really have noticed a huge difference in your pictures with Ryann. All the practice is paying off :) I need to take a class on Photoshop. I've had it for a year and still have no idea what I'm doing!!
great tips thanks for sharing!
www.modernsuburbanites.blogspot.com
Love these tips! Probably the most useful accessory I got for my camera was my Speedlite external flash (maybe similar to a lightscoop?) Just for taking photos of Annie mostly - they may not be the most technically perfect, but when I really just want to capture precise moments with no camera lag time, and for them to not be blurry - it's a lifesaver. Also love my 50mm - my first one broke after 3 years so I just got a new one and I'm so glad I did!
Great tips! That last edit is fantastic. My 50mm f/1.8 should be here any day, and I am excited. I have a question - the Light Scoop website says that the pop-up flash is not strong enough to reach the ceiling and bounce off even with the Light Scoop. So does that mean that you have an external flash/speedlight attached, in addition to the Light Scoop?
Great post! I'm with you- our house has the worst.lighting.ever. I will definitely be thinking about the natural light situation whenever we move! I'll have to check out the light scope! And thanks for the tip about shooting continuously- it's so hard to catch those perfect moments with squirmy kiddos!
Thanks for sharing all the wonderful tips
Thank you for writing this post! Seriously, it's hard to find a photography post that's approachable. I'm definitely going to look into the light scoop -- we have a dark house, too. And thanks also for PW's photoshop tricks. So handy!
Our house has horrible lighting, so I'll definitely be checking out the light scoop! Thanks for sharing.
Thank you for changing your comments, by the way! Now, they don't take over my reader!
And, thank you for posting this. The light scoop should be on its way to me shortly!
Post a Comment